Home | Modeling
| Links
| My Track | Hints
Racing Hop-Up
Hints - Updated 11-May-2005
Here are some hop-up hints for modern racers. Hope they
help!
1. A Good Use For Old Cassette Tapes
Many old and worn-out cassette tapes are held together with five
screws. These screws are the perfect size for T-Jets! They are a bit smaller
than the standard screws so they won't split the posts.
Also, I've found that some of the rollers inside the cassettes make nice
wheels.
2. Converting Tyco TCR Cars to Work on Slotted Track
The Jam Car easily accepted the push-in AFX guide pin in
the front hole where middle pickup shoe went. I also removed the
big ugly rear bumper. It's still ugly as sin, but it has no magnet
and the worm gear drive is fast enough to be challenging on a home
track. I have one with the weight in it and one without and
they're both fun to drive.
The normal TCR chassis, which will take any Tyco body, required
drilling to accept a Tomy SG+ guide pin, but it has a wicked top
end. On my little home track it needs a 60+ ohm controller just to
be driveable.
A neat feature of both cars is that they always go forward. The
Jam Car has electronics on a small circuit board that makes sure
the current always goes the right direction and the normal TCR
chassis has two crown gears that slip in one direction and catch
in the other.
3. Lowering the Tyco Lumina/Grand Prix
Lowering the Tyco is a bit of a challenge, because of the
mounting. But I was able to do it pretty well on the SECOND
attempt. The Lumina/Grand Prix body is pretty easy to work with.
Take a standard hacksaw and cut from the back wheelwell to the
front wheelwell on both sides. Then, using superglue, glue the
pieces back on. The hacksaw removes about 6 scale inches from the
height.
When gluing the pieces back on, make sure you push them toward
the center enough to fit snuggly on a chassis. Then reshape the
wheelwells with sandpaper wrapped around a pen or dowel and paint
the body.
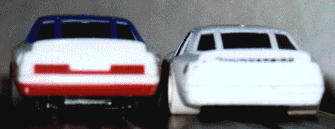
Here's a "slammed" Tyco next to a stock one.
4. Lowering the Tomy Super G+
Super G+ bodies are easy to lower, as long as they use
the body clips. With the body clip the SG+ chassis will also fit
most AFX bodies.
On each end of the body clip is a "step" that can be removed.
This will allow the body clip to move vertically within the
body.
After modifying the 75 cent body clip, put it on a chassis and
then put a body on and see how far up it goes. If you want to then
hollow out the wheel wells more, you can. If you don't want to
hollow out the wheel wells then put a thin piece of cardboard
between the wheelwell and the tire so the chassis is positioned
where you want it in the body.
Then glue the body clip into the body. After the glue dries,
remove any cardboard spacers, or make your wheel wells larger, if
needed.
You can still remove the chassis from the body and body clip,
but the whole thing is much less likely to come off in a race. The
lower center of gravity doesn't hurt none either.
Note the difference between the stock SG+ and the
"slammed" version.
5. How to Solder to Plastic Track
The trick is to put a damp sponge on the other side of the track when you
solder. It helps absorb the heat and keeps the plastic from melting as
quickly.
Then, I used hot glue to fasten the wires to the track and prevent tension
on the solder joints. It took a little while to solder all 16 wires (2 rails,
4 lanes, 2 power places) but they have held up very well.
If you're like most of us, you've got dozens of 9" curves to
experiment on. I destroyed a couple before I got the results I wanted and then
did the real stuff on straights.
Copyright © 1998-2011 by Malcolm
Michael. All Rights Reserved.